The fully restored Art Deco nightstand, featuring a sleek Black Caviar stain and bold teal-painted sides, standing as a stunning mix of vintage and modern design.

From Sad to Stunning: How I Brought an Art Deco Nightstand Back to Life

November 25, 20244 min read

From Sad to Stunning: How I Brought an Art Deco Nightstand Back to Life

Some furniture pieces just beg for a second chance. You know the ones I’m talking about—the sad, scratched-up, almost-unrecognizable pieces that most people would overlook. But as a vintage furniture fanatic, these are the gems that make my heart skip a beat. Enter: the solid maple Art Deco nightstand I stumbled upon not too long ago.

This little nightstand? Oooo buddy, it had seen better days.

An Art Deco nightstand disguised under layers of thick black paint and years of neglect, looking more like an old filing cabinet than a vintage gem.

At first glance, you could easily mistake it for an old filing cabinet. The entire surface was covered in thick black paint, with no visible wood, and it looked like it had been stashed away in an old storage shed or garage. Surprisingly, despite its rough exterior, there was no water damage—just years of neglect. But I knew, ok… really I was hoping that there was something special hiding under all that grime.

The First Look: A Diamond in the Rough

When I first got my hands on this nightstand, it was barely recognizable as furniture, let alone an Art Deco piece. Covered in layers of thick black paint, the sides were deeply scratched, and the handles were so sad, and had seen better days. The poor thing looked like it had survived years of storage in less-than-ideal conditions. But beneath all that mess was solid maple wood. This piece had potential, and I was determined to bring it back to life.
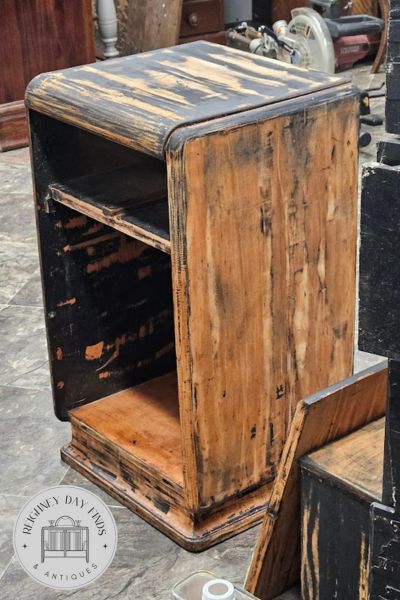
The stripped-down nightstand reveals its solid maple bones after hours of scraping and sanding, showing the first glimmer of its Art Deco charm.

Scraping, Stripping, and Sanding: The Road to Recovery

First things first, I tackled the old finish. Using my trusty carbide scraper, I started removing the thick layers of paint. This was no easy task—the paint was stubborn, but after a lot of elbow grease, I could finally see the wood underneath. Next, I used paint and varnish stripper to get the rest of the black paint off.

With the black paint gone, I sanded everything down nice and smooth. That maple wood started to show itself, and it was worth every bit of the hard work.

But the sides were a different story. The scratches
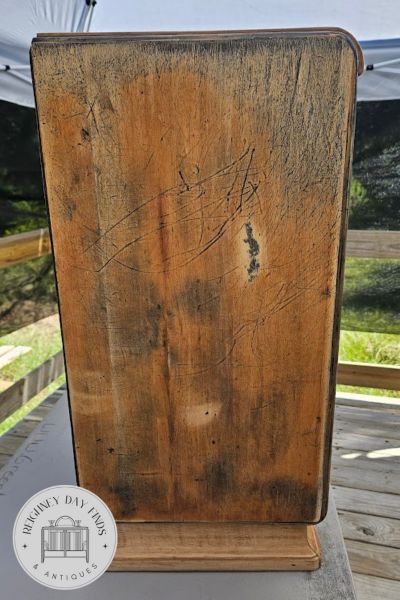
Close-up of the nightstand’s side panel after sanding, showcasing its scratches and imperfections before restoration.

were too deep to sand out entirely, so I had to fill them in with wood filler. After letting the filler dry and sanding again, the sides were ready for a fresh coat of paint.

Steaming Away Scratches: AMAZING!!!

On the top, drawer front, and door, there were shallower scratches that didn’t need filler. For these, I decided to try the steam trick. By placing a damp cloth over the scratches and using a hot iron, I raised the wood grain to minimize their appearance. It worked wonders, and after a final sanding, those scratches were 90% gone. Which was incredible considering where I started.

Prepping the Maple: Wood Conditioner for Even Stain

Maple can be tricky when it comes to staining, so I prepped the wood with oil-based wood conditioner to ensure an even, smooth finish. This step is crucial for woods like maple that tend to absorb stain unevenly.

The Finish: Black Caviar and Bold Teal

For the top, drawer front, door, and base, I chose ZAR’s Black Caviar stain. This rich, deep black/brown brought out the beautiful grain of the maple while giving the piece a sleek, modern edge. The contrast between the wood grain and the stain was everything I hoped for.

As for the sides, after filling the scratches, I decided to paint them a bold, deep teal. I used a high-quality teal paint that complemented the dark-stained wood perfectly. The paint added a pop of color while still allowing the natural beauty of the wood to be the star of the show.
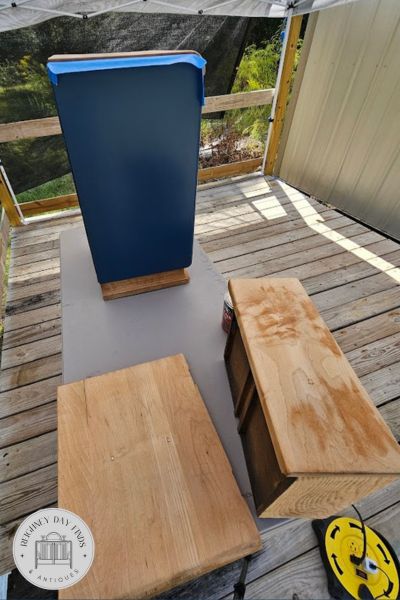
The nightstand stands tall with its teal-painted side revealed, while the door and drawer are laid out on a table, prepped and ready for the staining process to begin.

The Almost-Finished Look

Here’s a peek at the nearly finished nightstand:

The transformation was incredible—the piece looked nothing like the tired, forgotten nightstand I started with. Now, it was a bold, stylish statement piece that could fit beautifully in any modern or vintage-inspired home.

The Final Touch: Poly and Polish

To finish everything off, I applied several coats of water-based polycrylic to seal and protect the wood. The poly not only added durability, but it also made the wood gleam with a rich, deep glow. There’s something magical about that final coat—it’s like everything comes together in one beautiful, satin-ny package.

The Big Reveal

Once the poly dried, it was time for the big reveal.

The fully restored Art Deco nightstand, featuring a sleek Black Caviar stain and bold teal-painted sides, standing as a stunning mix of vintage and modern design.

The nightstand had gone from sad and scratched to fabulous and chic. With the rich dark stain, bold teal sides, and that sleek finish, it was a perfect mix of vintage chic and modern style.

HEY guess what? This beautiful Art Deco nightstand is for sale! You can bring this piece of history home by clicking here on the marketplace link.

If you're into bringing vintage furniture back to life like I am, or maybe you're just looking for some inspiration for your own projects, trust me—don’t pass up those sad little pieces at the flea market. They’ve got potential! And hey, if you’re not up for the challenge, you know where to find me.


The restored Art Deco nightstand with its door open, revealing a striking teal-painted interior accented with a gold stenciled design wallpaper for a touch of vintage flair.

I hope this nightstand’s second life inspires you to take a second look at those "lost causes" out there. They might just surprise you.

A front-facing view of the finished nightstand, highlighting the rich Black Caviar-stained wood, bold teal sides, and elegant brass hardware—a true statement piece.

Disclosure: This post contains affiliate links. As an Amazon Associate, I earn from qualifying purchases. This comes at no extra cost to you, and I only recommend products I truly believe will be valuable to my readers.


Hey, I’m Karen Reighney, the face behind Reighney Day Finds & Antiques. If you’ve stumbled across my little corner of the internet, chances are you love vintage furniture as much as I do—or at least you’re curious about what goes into turning tired, forgotten pieces into something beautiful again.

My love for furniture refinishing started way back when I was a teenager, tackling my parents’ nearly 100-year-old kitchen cabinets. I stripped them down to bare wood, painted them, and realized that—despite the sweat and frustration—there’s something deeply satisfying about taking something old and worn and giving it new life. I had no idea then that those projects would lay the groundwork for what I do now, but here we are!

These days, I specialize in vintage and antique pieces, with a soft spot for Art Deco and Mid-Century Modern styles. There’s just something about the clean lines, craftsmanship, and history behind these pieces that pulls me in. Whether I’m restoring a piece to its original glory or giving it a creative refresh with paint, my goal is always to respect the story behind the furniture. I love that mix of honoring the past while bringing in a fresh look that’ll fit perfectly in someone’s home today.

When I’m not working on a project, you’ll probably find me with my family, doing the usual balance of home life and running my business. I’d say my husband and son have noticed that I’m much more relaxed these days—I think there’s something about working with your hands and creating that just does wonders for the soul.

Through my blog, I hope to inspire others to take a chance on their own projects, whether it’s a small piece they’ve found at a flea market or something tucked away in the garage. I’m here to share what I’ve learned—both the successes and the mistakes (because, trust me, there’ve been plenty of those). At the end of the day, it’s about the joy of the process and the love for the craft.

So, whether you’re here for furniture tips, stories of transformation, or just to hang out, I’m happy to have you along for the ride.

Karen Reighney

Hey, I’m Karen Reighney, the face behind Reighney Day Finds & Antiques. If you’ve stumbled across my little corner of the internet, chances are you love vintage furniture as much as I do—or at least you’re curious about what goes into turning tired, forgotten pieces into something beautiful again. My love for furniture refinishing started way back when I was a teenager, tackling my parents’ nearly 100-year-old kitchen cabinets. I stripped them down to bare wood, painted them, and realized that—despite the sweat and frustration—there’s something deeply satisfying about taking something old and worn and giving it new life. I had no idea then that those projects would lay the groundwork for what I do now, but here we are! These days, I specialize in vintage and antique pieces, with a soft spot for Art Deco and Mid-Century Modern styles. There’s just something about the clean lines, craftsmanship, and history behind these pieces that pulls me in. Whether I’m restoring a piece to its original glory or giving it a creative refresh with paint, my goal is always to respect the story behind the furniture. I love that mix of honoring the past while bringing in a fresh look that’ll fit perfectly in someone’s home today. When I’m not working on a project, you’ll probably find me with my family, doing the usual balance of home life and running my business. I’d say my husband and son have noticed that I’m much more relaxed these days—I think there’s something about working with your hands and creating that just does wonders for the soul. Through my blog, I hope to inspire others to take a chance on their own projects, whether it’s a small piece they’ve found at a flea market or something tucked away in the garage. I’m here to share what I’ve learned—both the successes and the mistakes (because, trust me, there’ve been plenty of those). At the end of the day, it’s about the joy of the process and the love for the craft. So, whether you’re here for furniture tips, stories of transformation, or just to hang out, I’m happy to have you along for the ride.

Back to Blog